
Frequently Asked Question
Scope
This update applies to the following products;
- 2001-00382-000: OMNIA 11 FMHD DIGITAL AUDIO PROCESSOR
- 2001-00383-000: OMNIA 11 FM DIGITAL AUDIO PROCESSOR
- 2001-00279-000: OMNIA 11 FMHD - [NO AES192]
- 2001-00314-000: OMNIA 11 FM - [NO AES192].
Backup your current settings
⚠️ Before proceeding with any update, we suggest making a backup of your current configuration. Save your user processing, and I/O Config presets to your computer from the web interface's Data Mgmt page.
- Navigate to the Data Mgmt tab in the web interface.
- In the DOWNLOAD PRESETS section, click on any user preset you'd like to retain and save them to your computer.
- Scroll down to the DOWNLOAD IO CONFIGURATIONS section, and similarly, click on any I/O configs you need to save.
- Your network parameters and Livewire Input settings will be carried over and activated automatically after the update. In some cases, Livewire Output settings may not re-populate, so be sure to write your Livewire output channel numbers down or take a screen capture of configuration settings before proceeding.
IMPORTANT NOTES - PLEASE READ BEFORE UPDATING
⚠️ We recommend a full power cycle following the software installation. For this reason, we advise that you do NOT attempt this update remotely. Perform this update only while you are physically in front of the unit.
⚠️ This update is for Omnia.11’s currently running version 1.5, 1.6, or 3.x ONLY! If your unit is running ANY EARLIER VERSION and you have not installed the version 1.5(85) compact flash card, please go here to order the v1.5 CF card.
Software Update Procedure
Please download version 4.0(17) from here and save it to a known location on the computer you will use to perform the update.
⚠️ Below is the step-by-step procedure for uploading the new firmware to your Omnia.11. Note that this will involve removing the unit from the air for several minutes, so be sure to have a backup processor ready or perform the update at a time when the station can be down. Note that steps 1 through 5 can be performed while the unit is still on the air.
- Connect to the Omnia.11 via Ethernet using a web browser, then log in. (Default password is “omnia”).
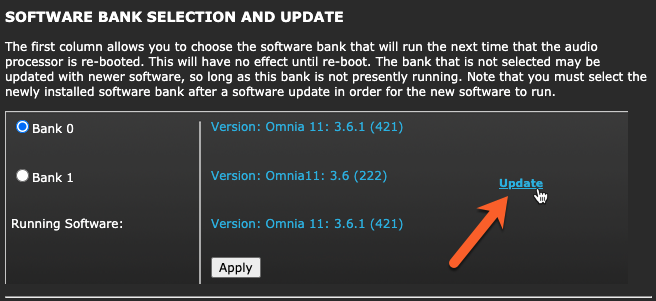
- Navigate to the Configuration menu, and in the “Software Bank Selection and Update” section, click on the word “Update” inside the gray button. (it will become underlined when the mouse is properly positioned over it).
- Read the confirmation text and click the “Continue” button to confirm that you want to proceed with the update process. Note that on-air audio will not be interrupted during the upload phase of the update.
- Click the “Browse” button and find the v4.0 update file (.oup) you downloaded from the Omnia website. Highlight it, click “Open,” and it should appear in the “Update file:” box. Click the “Update” button to begin.
⚠️ Do not disturb or remove power from the Omnia until the update is complete. Any power interruption will result in a corrupted upload, and the Omnia may have to be sent in for repair. Use of a UPS power backup is recommended, and shifting to a backup processor during this process is strongly advised.
- The update process loads the new firmware into the non-active bank and will take a couple of minutes. To view update progress, click on the link: “Click here to monitor the progress of the update.” You will need to manually move the scroll bar on the right-hand edge of the update monitor box down periodically (you can also use the mouse wheel) to see all of the text. When you see the " Update successful" message at the bottom, the file's upload is complete.
If you do not see the Update successful message after several minutes, contact Omnia Support for assistance. - Once updating is successful, click the “Select New Software (Configuration Page).” link at the bottom of the page. (Or the “Configuration” button at the top). In the “Software Bank Selection and Update:” section, you should now see Version 4.0 loaded into the currently inactive software bank. At this point, your Omnia.11 is still running the previous version, as you can see next to “Running Software:”
- To select and activate the new version, click the select button for the bank where the new version is located and then click the “Apply” button. (Be sure not to click the “Update” button again instead!) You will now see this message: “Software bank (0 or 1) selected. The newly selected software will be active after a reboot.
- At this point, you must reboot the Omnia.11 via power-cycle. Please remove power from the unit for about 20-30 seconds and restore power to the unit. Note that this will take you off the air for several minutes! Be sure you have a backup processor online or are prepared to be off the air for the next few minutes. Note also that the unit may reboot on its own more than once when powered back up.
- After the Omnia logo screen appears, you will see text messages on the screen as the unit boots and is configured to run the new software for the first time. Please note that the time required to boot for the first time will be much longer than a normal boot-up since an I/O board update will occur. (After about a minute or so, you should see the message "Updating I/O Board…This will take a few minutes." The screen will remain like this for the next few minutes. This delay is normal, and the update is not stuck! After finishing the I/O board update, you should see the message "Done with Update...Rebooting". The unit will now reboot (perhaps twice), and the touch screen interface will finally appear.
- Touch the Input or Output icon button and then the “I/O Config” tab. Now touch the padlock icon to unlock the I/O config preset list and select your desired I/O Config preset from the list. If you do not have one, select “default.”
- Touch any of the processing icon buttons and then the “Preset” tab. Now touch the padlock icon to unlock the preset list and then select your desired processing preset from the list.
- If you were using the Livewire outputs you may need to go into the Setup menu to re-enter your output channel numbers and re-enable the Livewire outputs. Please note that for proper sync, the Livewire inputs should not be used unless at least one of the Livewire outputs is enabled.
CONGRATULATIONS! The update procedure is complete. You may now return the Omnia.11 to normal service.
⚠️ If you are using the composite MPX outputs and are updating from v1.5, check your modulation since the MPX output levels may be higher for a given setting after the update.